

Most unused backyards hold untapped potential for relaxation and entertainment. You can transform this space into a functional outdoor living area with smart planning and budget-friendly materials. Avoid common drainage mistakes-they cause long-term damage. Choose durable furniture, add lighting, and define zones for dining or lounging to create a cohesive, inviting atmosphere you’ll use year-round.
Assessing Your Backyard Potential
Every great outdoor transformation begins with a clear look at what you already have. Sunlight patterns, existing vegetation, and natural slopes all influence your design choices. By understanding these elements, you shape a space that works with nature, not against it. Thou can build a lasting, functional retreat when you start with awareness.
Analyzing environmental factors like sun and wind
Observe how sunlight moves across your yard throughout the day-this affects seating comfort and plant health. Prevailing wind directions may require screening or strategic furniture placement. Shady zones limit some activities but offer relief in summer heat. Microclimates within your yard can support different uses. Thou can maximize enjoyment by aligning your layout with nature’s flow.
Evaluating soil quality and drainage requirements
- Soil texture determines what plants will thrive
- Drainage capacity prevents water pooling and foundation issues
- pH levels affect nutrient availability for gardens
- Compaction impacts root growth and water absorption
Healthy soil supports both hardscapes and greenery. Poor drainage can lead to mold, erosion, or unsafe surfaces. A simple percolation test reveals how quickly water seeps into the ground. Amending soil improves plant vitality and structural stability. Thou can avoid costly repairs by addressing ground conditions early.
Determining space dimensions and property boundaries
Measure your yard’s length, width, and usable square footage to define what fits. Confirm property lines to avoid disputes with neighbors or zoning issues. Note fixed features like fences, utility boxes, or tree roots that limit placement. Access points influence traffic flow and functionality. Thou can design efficiently when you know the exact limits and opportunities.
Accurate measurements prevent costly mistakes during construction. Use stakes and string to outline proposed zones like dining areas or fire pits before breaking ground. Overlooking easements could result in forced removal of structures. Consider how doors and pathways connect indoors to outdoors. Spatial awareness ensures your layout feels open, not cramped. Thou can create harmony between form and function with precise planning.
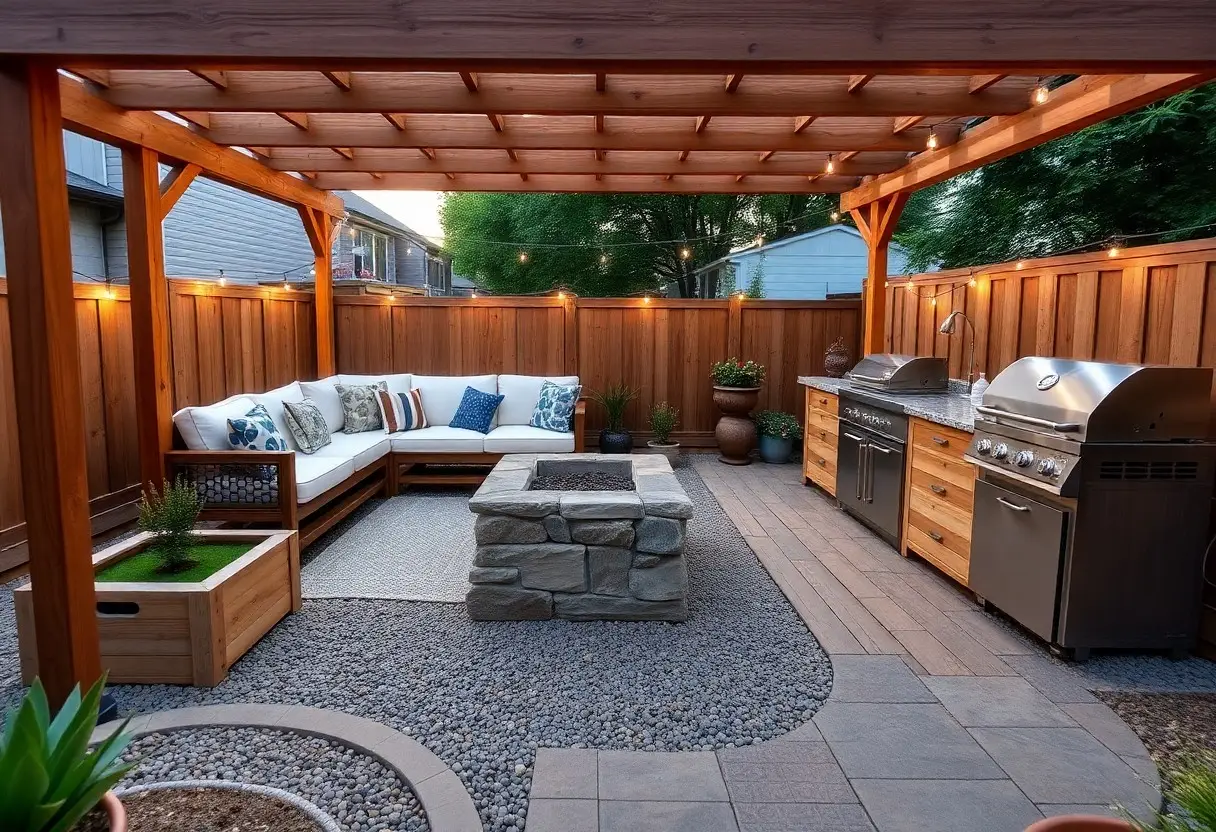
Defining the Functional Layout
Start by assessing how you want to use your outdoor area-whether for entertaining, relaxing, or dining. Map out zones that support these activities while maintaining balance and flow. Position key features like seating and tables to maximize comfort and sun exposure. Assume that a well-thought-out layout enhances both functionality and aesthetic appeal.
How-to zone your yard for dining and relaxation
Divide your space into distinct areas using furniture groupings or changes in flooring. Place the dining set near the kitchen for easy access, and position the lounge area farther out for quiet retreats. Use planters or low walls to subtly separate zones. Assume that clear zoning improves usability and visual harmony.
- Dining zone – Keep close to indoor kitchen or outdoor grill
- Relaxation zone – Locate in shaded or quieter part of yard
- Visual separation – Use rugs, planters, or elevation changes
- Comfort – Include seating with cushions and shade options
Factors to consider for traffic flow and accessibility
Plan pathways that connect key areas without sharp turns or bottlenecks. Ensure walkways are wide enough for two people to stroll side by side. Avoid placing furniture where it blocks natural movement from house to garden or pool. Assume that smooth circulation enhances safety and convenience.
- Pathway width – Minimum 36 inches for main routes
- Clear access – Unobstructed routes to doors, utilities, and features
- Surface material – Choose slip-resistant, level pavers or decking
- ADA compliance – Consider gentle slopes if needed for mobility
Think about how people naturally move from the house into the yard and between activity zones. A cramped path or poorly placed planter can disrupt movement and create hazards, especially during gatherings. Maintain open sightlines and avoid clutter near high-traffic areas. Assume that intuitive flow reduces accidents and improves guest experience.
Tips for creating a seamless indoor-outdoor transition
Align your patio floor with the interior flooring to visually extend the living space outside. Use similar colors and materials in both areas to blur the boundary. Install large sliding or folding glass doors to open up the wall entirely. Assume that continuity in design strengthens connection between rooms.
- Flooring alignment – Match or closely coordinate indoor and outdoor surfaces
- Color palette – Repeat tones and textures across thresholds
- Door choice – Opt for wide, openable panels like bifold or pocket doors
- Furniture style – Echo interior design in outdoor seating and decor
When your backyard feels like a natural extension of your home, you’re more likely to use it daily. Matching the ceiling height, lighting style, or even outdoor cabinetry to your kitchen can deepen the connection. Position seating so it faces both inside and out to encourage interaction. Assume that thoughtful integration increases comfort and everyday usability.
Selecting Durable Hardscape Materials
Choosing the right hardscape materials ensures your outdoor space stands up to weather and use. Durability, maintenance, and climate compatibility shape long-term satisfaction. The best options balance aesthetics with resilience, offering lasting value. After selecting materials suited to your environment and lifestyle, your backyard becomes a reliable retreat for years.
Comparing wood, composite, and stone options
Each material brings distinct benefits and trade-offs in cost, upkeep, and appearance. Understanding these helps match your vision with practical performance.
| Material | Key Traits |
|---|---|
| Wood | Natural look, requires sealing, prone to rot and insects |
| Composite | Low maintenance, resists fading and moisture, higher upfront cost |
| Stone | Extremely durable, timeless appeal, more expensive and labor-intensive |
Factors influencing material longevity and maintenance
Weather exposure, foot traffic, and installation quality directly affect how well your hardscape holds up.
- Moisture can warp wood and erode weak composites
- Sunlight fades colors, especially in lower-grade materials
- Freeze-thaw cycles crack poorly sealed surfaces
- Proper drainage prevents long-term damage
After choosing materials that resist these stresses, your space remains attractive and functional with minimal upkeep.
Longevity isn’t just about the material itself-it’s shaped by how it’s installed and maintained. Poor grading leads to water pooling, accelerating wear. Subpar fasteners or adhesives compromise structural integrity over time. Even high-quality stone can shift if set on unstable bases.
- Installation quality determines stability
- Regular cleaning prevents mold and staining
- Seasonal inspections catch issues early
- Sealants extend life for wood and stone
After investing in proper setup and routine care, your hardscape remains resilient through changing seasons.
Tips for choosing weather-resistant finishes
Surface treatment plays a major role in protecting materials from environmental damage.
- UV-resistant coatings prevent fading and degradation
- Water-repellent sealers guard against moisture absorption
- Non-porous finishes resist mold and staining
- Textured surfaces improve slip resistance in wet conditions
This ensures your hardscape remains safe, attractive, and low-maintenance over time.
Don’t assume all finishes offer equal protection-some wear thin after a single season. Look for products specifically rated for your region’s climate, whether humid, arid, or temperate. Factory-applied finishes often outperform field-applied ones due to controlled conditions. Reapplication intervals vary: wood may need sealing every 1-2 years, while premium composites can go a decade.
- Durable finishes reduce long-term maintenance
- Manufacturer warranties reflect confidence in performance
- Independent reviews reveal real-world results
- Color-through technology hides scratches and wear
This helps you avoid costly refinishing or premature replacement.
Essential Steps for Construction and Installation
Begin by mapping out your design with precision, ensuring every element aligns with your vision. Clear the area of debris and vegetation, then mark key zones for structural components. Proper planning at this stage prevents costly errors later. Secure necessary permits before breaking ground to stay compliant with local regulations. Work systematically to maintain momentum and quality throughout the build.
How-to prepare the ground and lay foundations
Start by leveling the soil and removing any roots or rocks that could shift over time. Use gravel or crushed stone to create a stable base, especially for heavy features like patios or sheds. Improper grading can lead to water pooling and structural damage, so ensure a slight slope for drainage. Compact the layers thoroughly to prevent sinking.
Installing structural elements like pergolas or decks
Anchor posts deep into the ground or onto concrete footings to resist movement. Follow manufacturer instructions for assembly and use weather-resistant materials. Incorrect fastening can compromise safety and durability, so double-check connections. Align each piece carefully to maintain symmetry and strength across the structure.
When installing decks or pergolas, pressure-treated wood or composite materials offer long-term resistance to rot and insects. Set posts in concrete below the frost line to prevent heaving in colder climates. Use galvanized or stainless-steel hardware to avoid rust. A poorly secured pergola can become a hazard in high winds, so never skip structural checks. Consider attaching lateral bracing if your design is tall or exposed.
Integrating utility lines for water and electricity
Call your local utility locator service before digging to avoid hitting underground lines. Run electrical wiring through approved conduit and connect to a GFCI-protected circuit. Improper electrical work poses serious fire and shock risks. For irrigation, use freeze-proof plumbing and install shutoff valves for easy maintenance.
Bury electrical and water lines at the depth required by local code-usually 18-24 inches. Use waterproof connectors and junction boxes for outdoor electrical components. For lighting or outlets, plan access points where they’re convenient but out of high-traffic zones. Professional installation is strongly advised for electrical systems to ensure safety and code compliance. A well-planned utility layout enhances both function and safety in your outdoor space.
Enhancing Comfort and Ambiance
Create a welcoming outdoor retreat by blending comfort with atmosphere. Choose weather-resistant fabrics in soothing tones and add soft textures through rugs and cushions. Integrate natural elements like potted plants and wooden accents to ground the space. Lighting, furniture, and temperature control work together to extend usability. Recognizing
Tips for selecting ergonomic outdoor furniture
Focus on body support when choosing seating and lounging pieces. Look for ergonomic designs that align with natural posture, especially in chairs and sectionals. Select weather-resistant materials like powder-coated aluminum or teak for durability. Cushions should have high-density foam that retains shape. Recognizing
- Pick adjustable recliners for customizable comfort
- Ensure seat depth supports thighs without pressure
- Opt for rounded edges to prevent snagging clothes
- Test pieces in person to assess comfort and stability
How-to design a layered lighting scheme
Build depth with multiple light sources at different heights. Use overhead string lights for general glow, path lights for safety, and accent fixtures to highlight plants or art. LED options offer energy efficiency and long life. Dimmers let you adjust mood instantly. Recognizing
Start with ambient lighting-think pergola-mounted fixtures or lanterns-to provide overall illumination. Add task lighting near cooking or reading areas with wall sconces or adjustable spotlights. Finally, include decorative elements like solar-powered garden stakes or flameless candles for subtle sparkle. This tiered approach ensures your space feels inviting after dark while improving functionality and safety.
Incorporating heating elements and cooling features
Extend your outdoor season with smart climate solutions. Install a freestanding fire pit, built-in heater, or patio-mounted infrared system for chilly evenings. For hot days, add a shade sail, misting system, or ceiling fan. Balance both for year-round comfort. Recognizing
Heating options like natural gas fire tables double as focal points and warmth sources, while portable propane heaters offer flexibility. On warmer days, a well-placed ceiling fan improves airflow and deters insects. Retractable awnings respond to sun shifts, reducing heat gain. Combining these elements lets you enjoy your space in any weather, making it a true extension of your home’s living area.
Softscaping and Final Decorative Touches
Transform your space with thoughtful softscaping and decorative details that reflect your style. Introduce plants, textiles, and lighting to create warmth and comfort. Layer textures through cushions, rugs, and greenery to invite relaxation. Recognizing
How-to choose low-maintenance regional greenery
Selecting native plants suited to your climate reduces watering and upkeep. These regional species resist local pests and thrive in existing soil. Opt for drought-tolerant varieties like lavender or sedum in dry areas. Recognizing
- Native plants adapt easily and support local ecosystems
- Drought-tolerant species cut down on irrigation needs
- Perennials return yearly, minimizing replanting
- Shade-loving varieties work well under trees or covered areas
Tips for adding privacy screens and vertical gardens
Install trellises, lattice panels, or bamboo screens to block unwanted views. Use climbing plants like jasmine or ivy to soften structures naturally. Position elements near seating zones for maximum effect. Recognizing
Privacy doesn’t mean sacrificing beauty-strategically placed screens define zones while enhancing aesthetics. Attach vertical gardens to fences or walls using modular planters for greenery in tight spaces. Choose fast-growing vines for quicker coverage and mix in flowering types for seasonal color. These features reduce noise and wind, making your retreat more comfortable. Recognizing
- Trellises support climbing plants and add height
- Bamboo screens offer instant, natural-looking barriers
- Living walls improve air quality and insulation
- Modular planters allow flexibility on patios or decks
Utilizing textiles and accessories for a polished look
Outdoor rugs anchor seating areas and add color underfoot. Choose weather-resistant cushions and fade-proof throws for lasting appeal. Incorporate decorative lanterns or planters to refine the atmosphere. Recognizing
Textiles bring indoor comfort outside without compromising durability. Look for solution-dyed acrylic fabrics that resist mold and sun damage. Mix patterns and textures in neutral or earthy tones to create depth. Add a statement throw or patterned pillow for personality. Accessories like side tables or solar-powered lights complete the experience. Recognizing
To wrap up
Following this guide, you transform unused backyard space into a functional outdoor living area tailored to your lifestyle. You choose durable materials, define zones for dining or lounging, and add lighting and greenery for comfort and appeal. With thoughtful planning and consistent effort, you create an inviting extension of your home perfect for relaxation or entertaining.
FAQ
Q: What are the first steps to turn an unused backyard into a functional outdoor living space?
A: Start by assessing the size, shape, and natural features of your backyard, such as sunlight patterns, drainage, and existing trees or slopes. Sketch a rough layout of how you want to use the space-whether for dining, lounging, gardening, or play. Clear out debris, overgrown plants, or unused items. Once the area is clean, define zones with simple materials like gravel, pavers, or decking. A clear plan and clean slate make it easier to build your outdoor space step by step.
Q: How can I add comfort and style without spending a lot of money?
A: Use secondhand or repurposed furniture like wooden crates turned into side tables or benches with outdoor cushions. String lights, solar-powered lanterns, or tiki torches create warm lighting at low cost. Add color and texture with outdoor rugs, throw pillows, and potted plants from local nurseries. Build a simple fire pit using stones or a metal ring for cozy evenings. These touches make the space inviting and personal without a big budget.
Q: What kind of plants or shade options work best for a backyard living area?
A: Choose low-maintenance, native plants that thrive in your climate, like ornamental grasses, lavender, or succulents. Use potted trees such as olive or citrus for flexible shade and greenery. Install a pergola, shade sail, or large umbrella over seating areas to block afternoon sun. Climbing vines on trellises add privacy and cooling cover over time. The right plants and shade make the space usable and comfortable in different seasons.